
Featuring ice, a splash of milk, and shots of espresso that have been shaken into a creamy foam, shaken espressos are a fun and bubbly drink perfect for any season. It’s a great way to enjoy an iced espresso with a little kick — and best of all, the drink is totally customizable, whether you’re more of a straight espresso or a super-sweet latte kind of person. If you’re still perfecting your at-home barista setup, we’ve got some good news for you: It’s super easy to make (and perfect) shaken espresso yourself.
As a former barista, I know that there are some things you just can’t skip when it comes to shaken espresso. I love a good brown sugar shaken espresso myself (who doesn’t?) and think it’s a great drink for anyone from beginners who don’t have many coffee tools to experienced baristas who are looking for a fun iced drink to whip up. You can make it in a batch, as a single-serve drink, with barista tools, or just in a jar. But if you want to absolutely nail your shaken espresso on your very first try, I’ve rounded up all the tips you need to know to shake up your morning coffee.
Use a proper container
A cocktail shaker can make all the difference to shaken espresso, taking it from a disappointing mixed coffee to a professionally-foamed drink. But what should you use if you don’t have a cocktail shaker? Essentially, you’re looking for any container that will give you a lot of extra room for the drink to shake around. If the container you’re shaking your espresso in is too small, then your coffee won’t have enough room to aerate. The lid of a small container can also prevent you from building up more foam if there’s nowhere for the froth to go.
The reason why a cocktail shaker is the go-to for many baristas is that it’s easy to use and will always give you enough room to shake your espresso shots around. Just pop the top off, drop your shots in, add ice, and shake away. If you don’t have a cocktail shaker on hand, however, you can always use a water bottle with a screw top, a large jar with a lid, or a thermos. Keep in mind that if you are using a thermos or water bottle, you need the mouth of the carafe to be large enough to fit ice inside and pour out your drink smoothly. A thin-necked bottle can disrupt the pour of your foam and get clogged up with cubes of ice, which will leave you with less foam than other kinds of bottles.
Shake your espresso with ice in the shaker
It’s true that you can aerate espresso shots all on their own, without any ice. This generally isn’t the way to go, though, unless you want a lukewarm shaken espresso (and potentially a minor explosion when the heat builds up inside your shaker). When you shake your espresso and your ice in the same container, the ice will rapidly chill the espresso as it’s aerated. This makes your shaken espresso much colder than it would be if you dumped the ice in at the end — which will also lead to awkward still-warm spots throughout your drink.
Shaking your espresso with your ice is also great if you want to serve your shaken espresso in a glass with no ice, but still want an icy-cold drink. This saves you precious cup space — instead of having to fill your glass up to the top with ice, you can leave all the room for your espresso (and other toppings, if desired). Less ice in your cup also spares you the risk of having all the ice melt and dilute your espresso before you have time to drink it all. When your shaken espresso is already being served icy cold, the ice in your drink is purely there to keep it cold, not cool it down. It’s a win-win-win.
Shake until foam appears on the top
This isn’t dalgona coffee, so you don’t have to shake your shaken espresso 100 times in order to achieve a deliciously creamy result. The timing all depends on your drink size and shaker. Generally, it shouldn’t take much more than 10-20 seconds to fully aerate your espresso — and, of course, the longer you shake it, the more foam your drink will get.
In order to make the most out of your shaken espresso, you’ll want to shake pretty vigorously — just don’t let go of the shaker cap! You’ll start to notice a bit of foam forming right away. Keep an eye on it as you shake to see how it’s shaping up. Once you achieve the exact amount of foam you’re looking for, it’s time to stop shaking.
Everyone will have a different preference for how much foam they prefer on their drink. In my opinion (as with many baristas), however, the foam is the key feature of the drink — it’s the whole reason you’re shaking your espresso, after all. With a few shakes, you can double the size of your original drink — and it makes it so much lighter and creamier, too. If you’re a fan of cold foam or cappuccinos, you’ll want to shake until you have a sizable amount of foam on top. But if you’re not sure you’re going to love a shaken espresso, there’s no harm in shaking just a few times and trying the drink before you go all in.
You can use barista milks for extra creaminess and stability
Many coffeehouses that offer shaken espressos will add some sort of milk to them — and it’s pretty much guaranteed to be a barista milk. Barista milks are rich, creamy, and possibly even flavored or sweetened. They’re great for adding smoothness and extra depth to your shaken espresso, making the foam even dreamier and the espresso so much richer than it was before.
You’ll typically add your milk after you’ve shaken your espresso — just a small splash is enough. But if you so choose, you can also aerate your espresso with your milk. Barista milks froth faster and create a more stable foam thanks to their unique protein and milkfat ratio. Especially when it comes to the best milks for frothing, barista milk can take your shaken espresso to a whole new level of creaminess and richness. Even just a small splash of barista milk will go a long way when it comes to shaken espresso. You’re likely to find that the foam on your espresso will last longer once it’s been aerated, too.
You can find a wide range of barista milks at most grocery stores, from barista oat milk to barista whole milk (and we ranked the best barista milks for you already). These barista milks will also come in a range of flavors if you prefer to sweeten your shaken espresso. If you’re not able to find barista milks or just don’t want to deal with buying an entirely separate milk for your coffee, whole milk will also work well for shaken espresso — it has an ideal milkfat-to-protein ratio. As for plant-based milks, in my opinion, you’ll be likely to find that almond milk or oat milk will work well for creating a thin, shaken, cold foam.
Don’t be afraid to use syrups
A traditional shaken espresso focuses primarily on the espresso shots, with just a small splash of milk (and maybe some sugar) mixed in. But the fun of being a home barista is getting to experiment — and it’s not a shaken espresso cardinal sin to add extra flavoring if you so choose. Barista syrups are a great way to add sweetness and flavor to any shaken espresso. The pumps of syrup won’t disrupt the foam you’re trying to make, so be sure to add your flavoring to the mix before you start shaking your drink.
I would even dare to argue that a shaken espresso is one of the best iced drinks for experimenting with syrups because it allows you to completely blend your syrup with the rest of the drink. Have you ever had a mocha that tastes like plain coffee until you get to the bottom and realize all the chocolate has coagulated on the base of the cup? Maybe you’re a sucker for a vanilla latte, except you have to suffer through unsweetened coffee on top and a sickly-sweet latte base because the syrup wasn’t mixed in properly. These mistakes are literally impossible to make with a shaken espresso, because you’ll be shaking the drink so thoroughly that the syrup will be well-dispersed throughout.
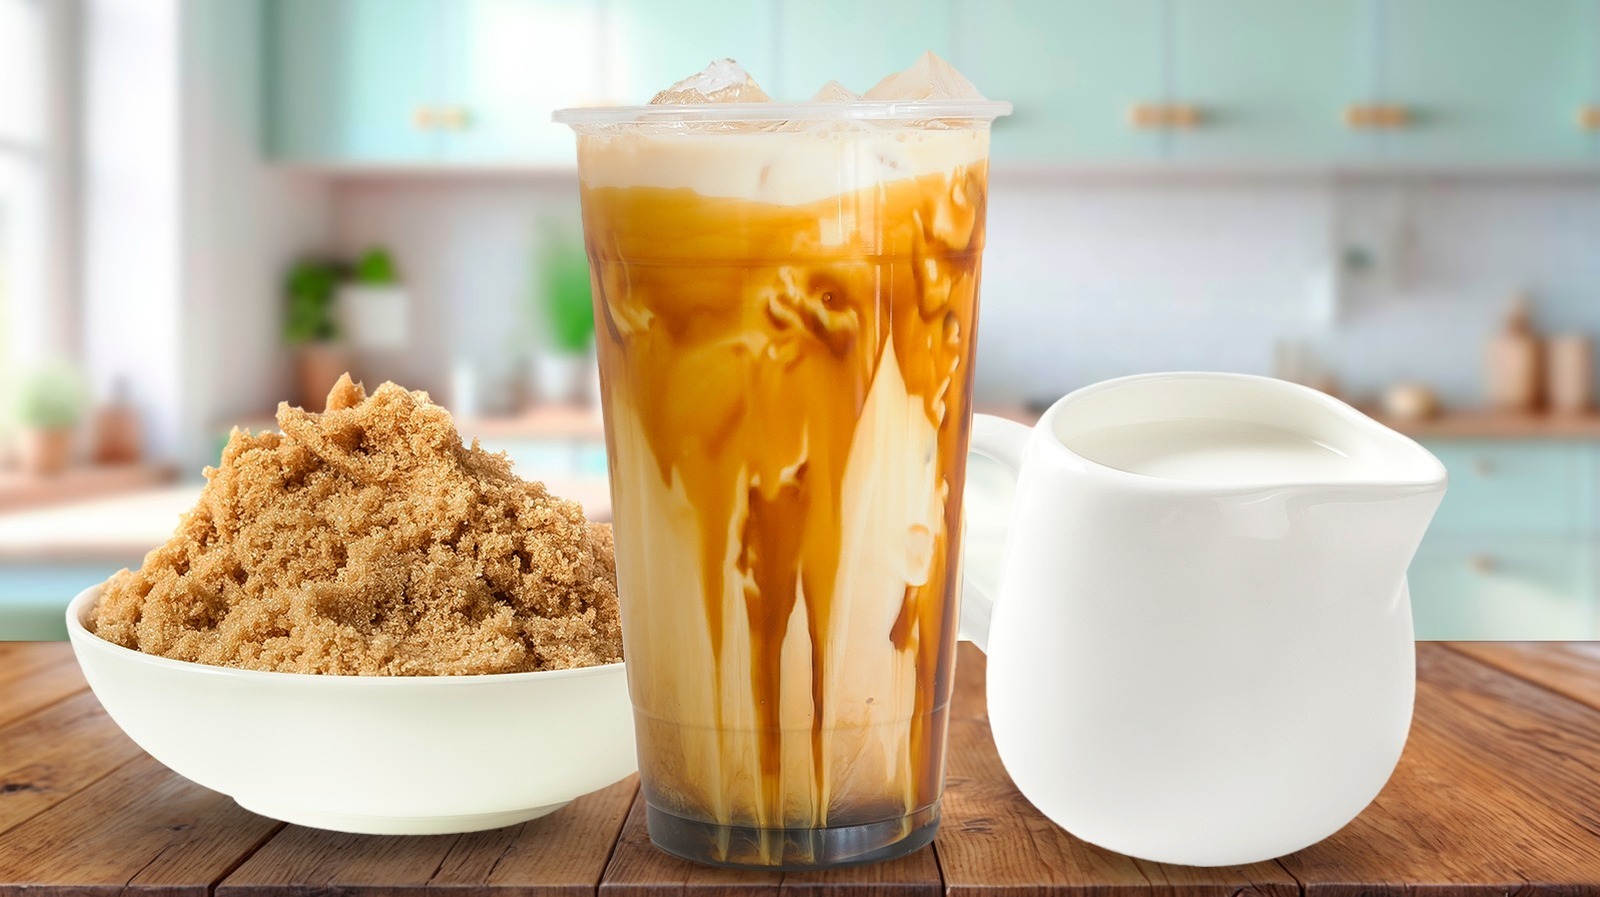
Go for brown sugar, not white sugar
Here’s a real expert secret: You should use brown sugar, not white sugar, in your shaken espresso. Okay, okay — it’s actually up to your personal preference, of course, because not every coffee lover has the same tastes. But the reason why brown sugar is so great in a shaken espresso is because it complements both the bold and subtler flavors of the espresso shots. It adds depth and a slightly caramel-y flavor, whereas white sugar will exclusively add sweetness. This is why you’ll see shaken espresso drinks with brown sugar on more coffee shop menus — like Starbucks’ — without a white sugar option.
Brown sugar is also just a little bit less sweet than white sugar, which can allow it to blend more naturally with the shaken espresso. Because of its molasses flavor (which is just plain delicious with a woody or smoky coffee, by the way), brown sugar acts more like a syrup than just a sweetener. It enhances the taste of your espresso (and makes it more palatable if you don’t like unsweetened coffee) and adds flavor that isn’t overwhelming.
Know how many shots you want in your shaken espresso
Typically, a shaken espresso will contain at least two shots. If you’re planning on making a larger drink, of course, you’ll need more espresso shots. Think about your milk-to-espresso ratio (if you’re using any milk, that is); you don’t want to overpower the espresso shot by adding too much milk, so if you’re only using one espresso shot, you’ll end up with a small glass of shaken espresso.
If your shaken espresso turns out on the smaller side, that’s perfectly fine. There’s no need to go overboard with the shots just because you want a larger size. Up to four or five shots, however, will net you a much larger drink. Just note that you should probably also be increasing the amount of milk you use each time you add a shot.
Decaf will taste just as good in a shaken espresso
Of course, a shaken espresso might sound to some like a recipe for an over-caffeinated disaster. But there’s no need to stick to purely caffeinated shots if you’re trying to enjoy a shaken espresso — decaf shaken espresso will work just fine. Pull your shots as normal, add milk and ice, and shake things up a bit.
Using decaf coffee is also a great way to achieve a drink with more volume, but without increasing the caffeine content. For example, you could pull one regular shot and three decaf shots. This will net you a very large shaken espresso, but you won’t have to worry about actually consuming four shots worth of caffeine. Generally, decaf shots shouldn’t affect the flavor profile of your drink, either — and you definitely won’t find any differences between caffeinated and decaffeinated espresso when it comes to aeration.
There’s no need to use milk if you don’t want to
If you don’t want to add milk to your shaken espresso, there’s really no need to. A shaken espresso can be just as simple as pure espresso shots with a little bit of ice. While you’ll likely find that the most common forms of shaken espresso do include at least a small splash of milk, it’s not a necessary component of the drink — in fact, those who are focused on finding the ‘perfect’ espresso shot prefer to leave out the milk.
When you skip the milk, your shaken espresso will taste a lot stronger. You’ll likely have an easier time noticing all the different tasting notes in your drink. Your shaken espresso might even taste less sweet, too. Of course, leaving out the milk in a shaken espresso also means that your drink will turn out at least a little bit smaller than usual — unless you work overtime on making extra foam to cover the difference, of course.
You can blend your shots if you really want to aerate them
Blending your shots together really isn’t traditional, but it is fun! If you throw a few shots of espresso in a blender for about 10 to 30 seconds, you’ll get a super foamy, creamy cup of espresso shots that has even more foam than you can achieve by just shaking.
Every inch of the espresso shots will be thoroughly aerated by the blender, which means that you’ll have a much more bubbly, foamy drink than you would otherwise — basically, the foam you’d normally get on top of your shaken espresso will be extended throughout the whole drink. Because there will be so much air in your drink, it will also likely be a bit larger than you expect. This is a fun alternative if you’re not using milk in your shaken espresso or if you’re just short on time and don’t want to bother with a shaker. It’s also a really easy way to batch make a bunch of shaken espressos at once if you so choose.
You can add cold foam on top for more of a stable, creamy foam
Another really fun option for shaken espresso is to leave the flavoring and sweetener out of the blended base and instead top the drink with cold foam. This will create a super rich and stable foam on top of your drink that will last longer (and be thicker) than the foam you’ll get from aerating your espresso. Plus, using cold foam can also be a good way to incorporate flavors and sweeteners to your espresso. If you’re really dedicated to the shaken espresso life, you can double the amount of foam you have in your drink by shaking your espresso vigorously before topping it with cold foam.
If you’re not planning on blending in milk and syrups to the base of your espresso, a cold foam is a good way to customize your drink. This is yet another bonus for batch-made shaken espressos — if you’re shaking double the drink, then you can leave the base as plain espresso shots and ice and use cold foam to create different flavors and levels of sweetness for the final drinks. Just don’t forget to learn about all the ways to upgrade your cold foam like a barista, too.
Shaken espressos are traditionally smaller
When you’re making a shaken espresso, you don’t want to fill your cup all the way up with milk and ice (well, unless you’re using a very small cup, of course). Because it’s an espresso-based drink, the main focus is the shots of espresso (have we mentioned that enough?). Even if you’ve created a lot of foam, it’s normal not to be left with a large drink (or to have a drink that’s mostly made of foam), so don’t feel obligated to add a bunch of milk until there’s absolutely no room left in your cup!
Those who are looking for more of a latte-like drink can definitely add more milk, flavorings, and cold foams, but a typical shaken espresso will be small, with little milk, and with only a bit of ice (to avoid having to fill up a huge glass for a small drink). If you’ve ever had a typical espresso drink, you know that it always comes in a teeny tiny cup with nothing but one or two shots of espresso inside. A traditional shaken espresso won’t be that small (because of the foam), but it will have a similar vibe.
With all that being said, however, there’s no secret barista guidebook that says you absolutely can’t use extra shots of espresso, a lot of milk, and a delightful flavored cold foam to make your shaken espresso suit your palate. Just know that if your focus is mostly on the espresso, your drink will be smaller and simpler, but still plain delicious.


